Web Designer India

Web Designer India

What is Payoneer and how to create step-by-step ?

Are you doing business as will as freelancer work with different countries and international marketplaces like upwork,fiver , freelancer  then you need to a payment solution , which is powerful and necessary tool for doing business from different currencies .

Payoneer offers a multi-currency account for your business to make payments and receive payments globally. this is best account gives everything you need pay supplier , exporter , freelancer.payoneer are help . 

Payoneer is a secured payment platform that enables businesses around the world to transact globally as easily as they do locally. It is a regulated payment platform that allows merchants and business owners to send and receive payments easily.

They offer direct payment solutions and it is meant for business payments, receiving payments, and currency conversion. Payoneer also offers a global payment solution enabling businesses to manage international payments, bill or request payments from clients, receive payments through popular marketplaces, and pay freelancers anywhere they are in the world.

Some of the marketplace Payoneer work with include Airbnb, Fiverr, Shutterstock, udemy, Upwork, eBay, etc. They partner with several companies and industries, From freelancers to eCommerce merchants, Payoneer supports thousands of clients and marketplaces to help them ensure secure payments are made easily and efficiently, streamlining the process and reducing costs, they have over 5 million customers around the world.

How To Sign-Up For Payoneer Account

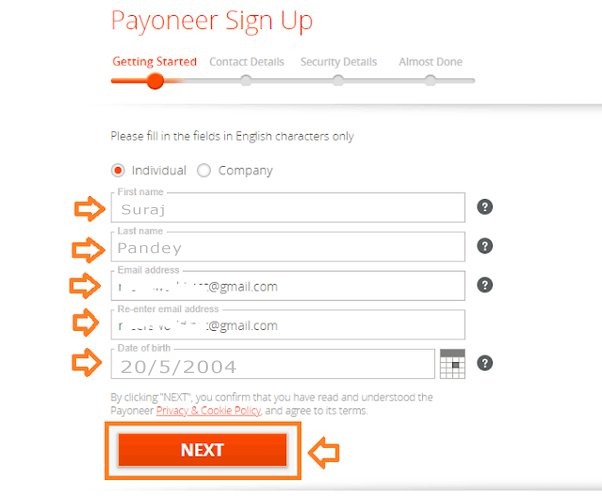
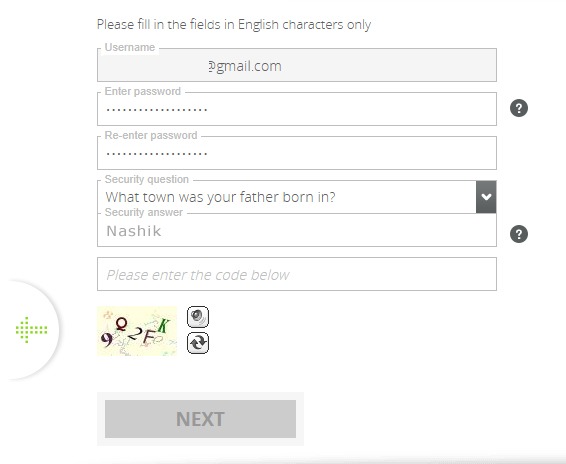
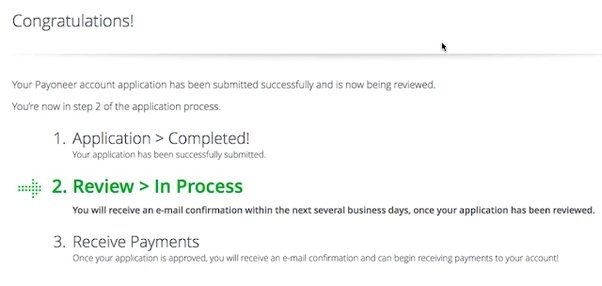
There are 4 steps in the Payoneer signup process:
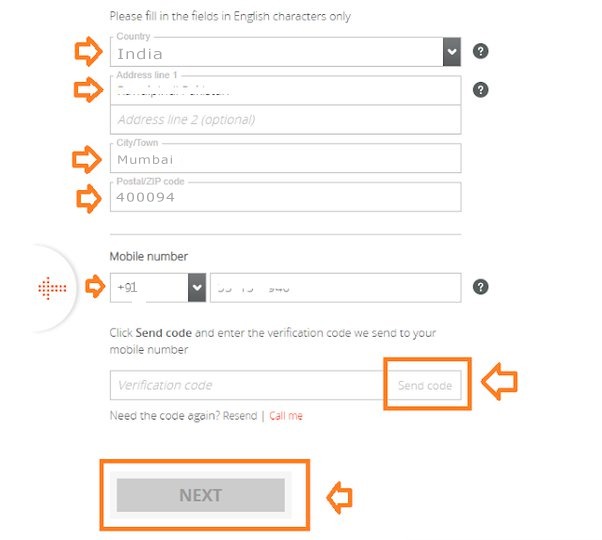
  • Go to the officialSign-up Page of Payoneer.
  • Click “Sign Up & Earn $25* Bonus”.
  • Page Link Payoneer | Get Paid by Marketplaces & Direct Clients Worldwide
  • You will earn $25 when your balance exceeds or reach $1000.

Step 1: Get Started

  • Choose Individual if you want to create for yourself. You can create for your company as well. Here we are making for “Individual”.
  • Enter your First Name.
  • Enter your Last Name.
  • Enter your Email Address.
  • Enter Your Date of Birth.
  • Make sure to provide this information according to your official certificates like a Birth Certificate or National Identity Card.
  • Click NEXT.

Step 2: Contact Details

  • Choose your Country.
  • Enter your correct & complete Address.
  • Enter your City/Town name.
  • Enter the Postal or Zip Code of your city. If you don’t know Google it.
  • Enter your active Mobile Number because it will verify your number by sending a code. Do not give someone else’s number.
  • Click the “Send code” link inside the “Verification Code” textbox. It will send you a code via text message.
  • Enter the code that you will receive on your phone in the “Verification Code” textbox.
  • Click NEXT.
  •  

Step 3: Security Details

  • Enter your Username. The username is your Email. The email address that you have entered in Step 1, enter that again here.
  • Enter a secure password.
  • Choose a Security Question and Enter the answer. Note down this question and save it somewhere. This information is required when you forget your password.
  • Enter the Captcha(Code).
  • Click NEXT.

Step 4: Almost Done

  • Choose the type of your local Bank Account whether it is your Personal or Company account.
  • We are choosing “Personal account”.
  • Choose your “Bank Country” means where your local bank is located.
  • Choose the “Currency” of your country.
  • Enter your Bank Name.
  • Enter the Account Name. It is the Title of your local Bank Account. It is mostly your full name. It is written on your checkbook or ATM card.
  • Enter the IBAN.
  • IBAN is your International Bank Account Number. It is used for international transactions. It is your bank account number, only the difference is that some letters are added to your account number. You can get your IBAN from your online bank account or you can request your bank to provide you the IBAN. You can also create IBAN by yourself by visiting your bank’s website.
  • Tick “I agree to the Terms and Conditions and Privacy & Cookie Policy”
  • Tick “I agree to Pricing and Fees.”
  • Click NEXT
  • You will be redirected to the Congratulations Page. You have successfully signed up for a Payoneer account. After a review, Payoneer will send you an email whether your application is approved or not. In most cases they approve, so you don’t need to worry.
  • Once your application is approved they might ask for your scan copy of National Identity Card or Birth Certificate just for the verification purpose. Once you upload and they verify your documents your Payoneer account will be fully verified.
  • Once you start receiving payments you become eligible to order Payoneer Prepaid MasterCard. It works just like any other MasterCard. The card is accepted worldwide, wherever MasterCard is accepted electronically